Posts

Showing posts from January, 2021

Estimate/Quotation Help Guide

Image
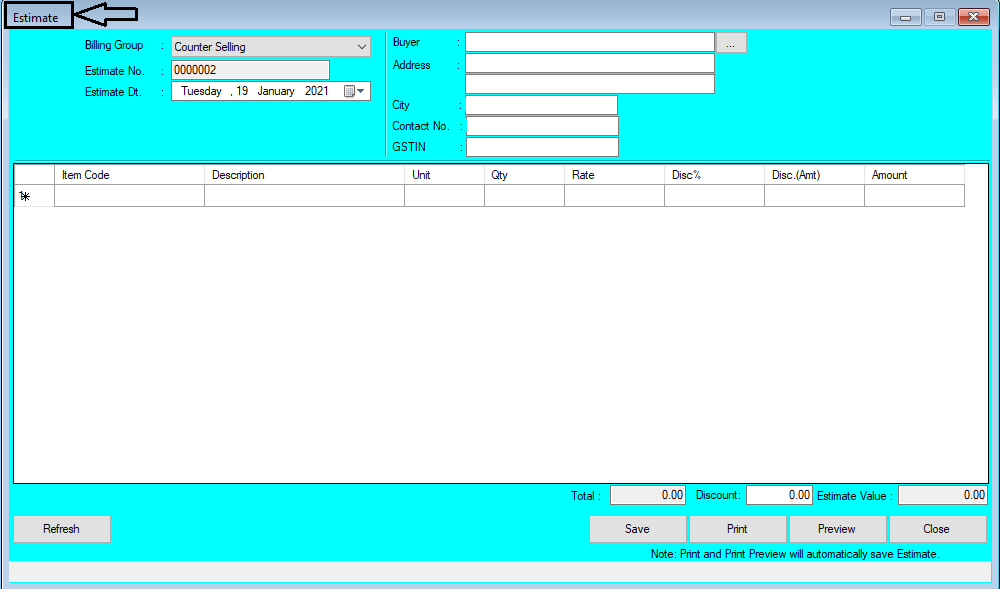
How to Create/Modify/Delete Estimate in Chanakya ERP Create Estimate Click on  Estimate  in  Inventory Menu  to open Estimate option (as shown in below image). If You have Created Multiple Billing Groups then Select Billing Groups and Estimate Number will be Created (Automatically & Manual Setting in Document Number Settings option) , then Select Estimate Date as shown in below image Press " F12"  Key to View Retail Buyer List or Simply Press on Three Dot (...) to view the Retail Customer Lis t or Simply Enter the New Customer  details with his complete Address , City and Contact No.  as shown in below image Select Retail Customer from List or Simply Search in Search Box to View customer Name and Select or Double-Click to View the Customer Name in Buyers column as shown in below image On Item Code Enter Item First Digit or Enter (%) and Click on Enter Button to Open Select Item Window in which you can Select Item as shown in below image Double Click or Clic

GSTR1 Filling Help Guide

Image
How to File GSTR1 in Chanakya  ERP  Without login GST Portal

Create & Permission For User Help Guide

Image
How to Create/Modify & Set Permission to New User in Chanakya ERP Create User Click on  Create User  in  Financial/User Menu  to open Create User option (as shown in below image). Enter all the details Specified within the box Login ID: Unique Login ID is Required  Password: Enter your Login Password, which you could Remember easily Re-Password: Re-Enter your Password, The same you entered before in Password Panel User Name:  Please Enter your Name  Address: Enter your Full Address Place: Enter Place Phone: Enter your Phone Number Status: Select "Active" as status Company Access: If more than one company is used in software then Select Company in which you want to Create User Click on Create button to add the User Details successfully. After user Creation User details will be shown in Blank Box , as shown in below image Modify User Click on  Modify User  in  Financial/User Menu  to open Modify User option (as shown in below image). Select the Specified User whos

Money Receipt B2B Help Guide

Image
How to Create/Modify/Delete Money Receipt B2B Voucher in Chanakya ERP Money Receipt B2B Click on  Money Receipt B2B  in  Accounts Menu  to open Money Receipt B2B option (as shown in below image). Receipt Number  ( which is Generated Automatically or can be set in Document Number Settings ),  Receipt Date  (select the date of Receipt from Buyers) and Other column details ( Select Party .,  A/c Balance , Receipt Amt . Receipt Type , Bank Name Etc .) as shown in below image  Click on Select Party Column and Press "F12" Key to open Buyer details in Pop-up window to View all Party/Buyer details, You can also add Party details while Pressing "F12" Key on Search Box   option, as shown in below image Create Party Master windows will open, where you have to Make Entry for Party Type Buyer as shown in below image Double-Click or Select the Party/Buyers details to View the Party Details in Money Receipt B2B , as shown in image below Selected Party Name will be displa

Financial Year Setting Help Guide

Image
How To Create/Select/Close/Delete Financial Year Setup in Chanakya ERP Create Financial Year Click on  Create Financial  in  Financial/User Menu  to open Create Financial option (as shown in below image). Select Financial Year while Clicking on Upward/Downward Arrow in the Year Selection box and then Click on Create Button to Add a New Financial year , as shown in below image After Clicking on Create Button One Message will display on same screen as "Financial Year Successfully Created" , Click on OK button, as shown in below image Select Financial Year Click on  Select Financial  in  Financial/User Menu  to open Select Financial option (as shown in below image). All Financial year Created by User are Visible here, You can Select particular Financial Year According to your use and View/Work in that Financial Year, as shown in below image Close Financial Year Click on  Close Financial  in  Financial/User Menu  to Close Financial year (as shown in below image). When Fina

Money Receipt B2C Help Guide

Image
How to Create/Modify/Delete Money Receipt B2C Voucher in Chanakya ERP Money Receipt B2C Click on  Money Receipt B2C  in  Accounts Menu  to open Money Receipt B2C option (as shown in below image). Receipt Number (which is Generated Automatically), Receipt Date (select the date of payment from customers) and column details ( Invoice No ., Invoice Date , Customer Name , city, number, Invoice Value, Dues , Cash & Card receipt) as shown in below image  Customer Name ( Cash or Name ) Dues are listed according to Invoice ( Invoice No. , Invoice Date & Invoice Value ) as shown in below image You can Take Receipt in Cash Receipt or Card Receipt , Total Cash or Total Card payment will be displayed at Bottom and Click on Save Button to Save the voucher ( Money Receipt ) as shown in below image After Clicking on Save button a Pop-Up Window will appear on screen displaying message "Successfully Money receipt B2C Generated" with Receipt No. and Click on OK button to &quo