Posts

Showing posts with the label Purchase

Serial/IMEI/Barcode Number Generation Help Guide

Image
How to Generate Serial/IMEI/Barcode Number in Chanakya ERP First You have To Enable the Settings from "Tool Menu" Go to "Misc. Settings" Go for "IMEI/Serial/Unique Barcode" Option  Select "Enable"   Click on Save Button And Re-login your Software to Enable those Settings Go to "Inventory" Menu Open "Purchase Window" Select the Item for Purchasing and Enter the Quantity Press "F12" on Quantity Column to Open "Serial No. Entry" Column as Shown Below in Image Select the Segment You Want to Generate (Serial/IMEI/Barcode) You can Find Two way to Generate Serial/IMEI/Barcode Number Manual Entry defines you to Enter Manual Barcode/Serial/IMEI Number in Below Column Automatic Generation will Generate Barcode/Serial/IMEI number Automatic , for Each Quantity you are Purchasing By Clicking on Automatic Generation , Barcode/Serial/IMEI Number will be Auto Generated   Barcode/Serial/IMEI Will be arranged in S...

Purchase Vehicle Entry Help Guide

Image
How to Create/Modify/Cancel Purchase Vehicle Entry in Chanakya ERP Create Purchase Vehicle Entry Click  on  Inventory Vehicle Menu Click  on  Purchase A new window will popped up Enter  Your  Purchase Date  -  (Current Date) Purchase Number  will be Created  (Automatically & Manual Setting in  Document Number Settings  option) Enter  Your  Invoice Date (Date at which Invoice was Created by Supplier),  as shown in below image In the Supplier Text box   Press "F12"  to  Select  Party/Supplier  details, or  Click  on  Three Dots   (...)  to view the  Party/Supplier  List, you can also  Click  on  Plus  Button  (+)  to  Create   Party/Supplier   Master , as shown in below image Again new window will popped up with all your supplier list Select Supplier All the basic detail of your supplier will be full filled ...

Shortcuts Key Module Wise Help Guide

Image
How Shortcut Keys will be Helpful while Using Chanakya ERP Shortcuts Key During Purchase Entry, these Shortcuts could be Useful "F12":- To select Supplier’s details and Double press F12 to Enter new party details or Create party master "F11" :- To Open Additional details Features , in which you can Add Model Number, Serial Number, Brand and Warranty Till Date. You can also Add Service Description details "F10" :- To Open the Sale Price Setting Margin ( In Three Category ) in B2B (It will be in Percentage ) and B2C (In Rs .) [ In Pharma Section ] "Ctrl + I":-   Press  during  Purchase window , It will Open  Import Purchase Item  window, where Excel data can be Imported through  Copy & Paste  Option "Alt + B":- To Print the Barcode of Purchased Item According to Total Quantity Purchased per Item "Alt + S":- To Save the Purchase Invoice and Add the Purchased Item Into Stock "Alt + C":- To close the Purchase ...

Reverse Charge Invoice (RCM) Help Guide

Image
How to Create/Modify/Cancel Reverse Charge Purchase Invoice (RCM) in Chanakya ERP Create Reverse Charge Invoice (RCM) Click on Reverse Charge Invoice  in  Accounts Menu  to open Reverse Charge Purchase Invoice option (as shown in below image). Invoice Number  ( which is Generated Automatically or can be set in  Document Number Settings ),  Invoice Date  (select the date of RCM Purchase Invoice), as shown in below image Press "F12" to Select Cr. A/c . and Press "F12" to Select Dr. A/c for Purchase for Reverse Charge Purchase Invoice (RCM) , as shown in below image Enter Item Name , HSN/SAC code , Units , Quantity , Rate & Etc ., fill other details. You can Add Items and their Total value , GST value, Net value will be displayed at bottom of screen. Remarks/Narration can be added Against Reverse Charge Purchase Invoice, Click on Save button to view the Changes, as shown in below image Modify Reverse Charge Purchase Invoice Press  "F12" ...

Non-Inventory Purchase Help Guide

Image
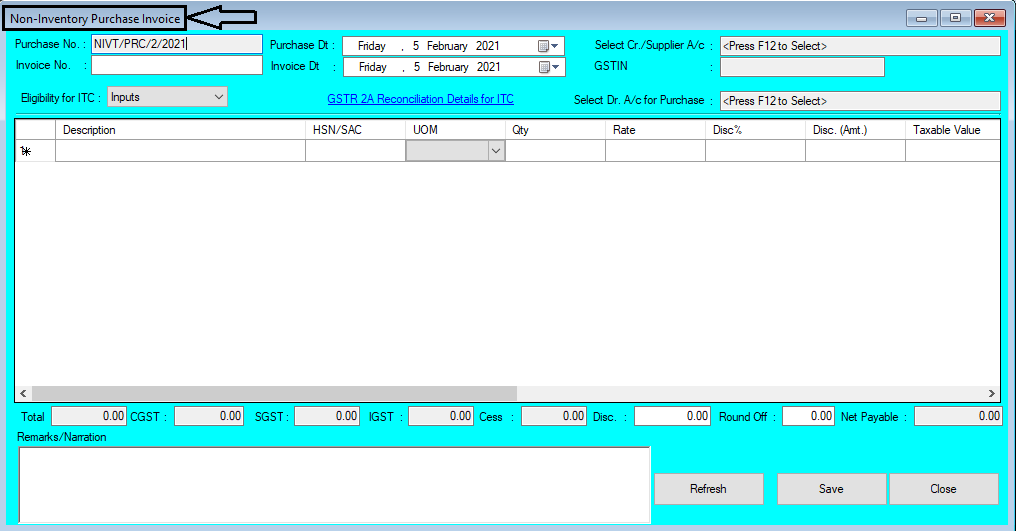
How to Create/Modify/Cancel Non-Inventory Purchase in Chanakya ERP Create Non-Inventory Purchase Click on Non-Inventory Purchase   in  Accounts Menu  to open Non-Inventory Purchase option (as shown in below image). Purchase Number  ( which is Generated Automatically or can be set in  Document Number Settings ),  Purchase Date  (select the date of Purchase)  Invoice Number will be Entered ( Which will be given by Supplier ) and Invoice Date will be Set According to Supplier Bill date ,  as shown in below image Press "F12" key to  Select Cr./Supplier A/c with whom Your are Purchasing Non-Inventory Item, Supplier Should have Valid GSTIN Number, without GSTIN Number Supplier will be not Valid for Non-Inventory Purchase, Press "F12" to  Select Dr. A/c for Purchase for Non-Inventory Purchase Item, as shown in below image Select Eligibility For Input Credit , ITC ( Inputs, Capital Goods, Input Services & Ineligible ),   as ...

Purchase Entry Help Guide

Image
How to Create/Modify/Cancel Purchase Entry in Chanakya ERP Create Purchase Entry Click on Inventory Menu Click on Purchase A new window will popped up  Enter Your Purchase Date - (Current Date) Purchase Number will be Created  (Automatically & Manual Setting in  Document Number Settings  option) Enter Your Invoice Date (Date at which Invoice was Created by Supplier), as shown in below image P.O ( Purchase Order ) Number ( If Created then Press "F12" key to View and Select P.O Number ), as shown in below image You can also  Click  on  View P.O details  to  View  the  Items  added in Particular  Selected P.O  ( Purchase Order ) as shown in below image In the Supplier Text box  Press "F12" to Select Party/Supplier details, or Click on Three Dots (...) to view the Party/Supplier List, you can also Click on Plus Button (+) to Create Party/Supplier Master , as shown in below image Again new window will p...