Posts

Showing posts from 2021

Chanakya ERP Update Release 1.1.1.3

Image
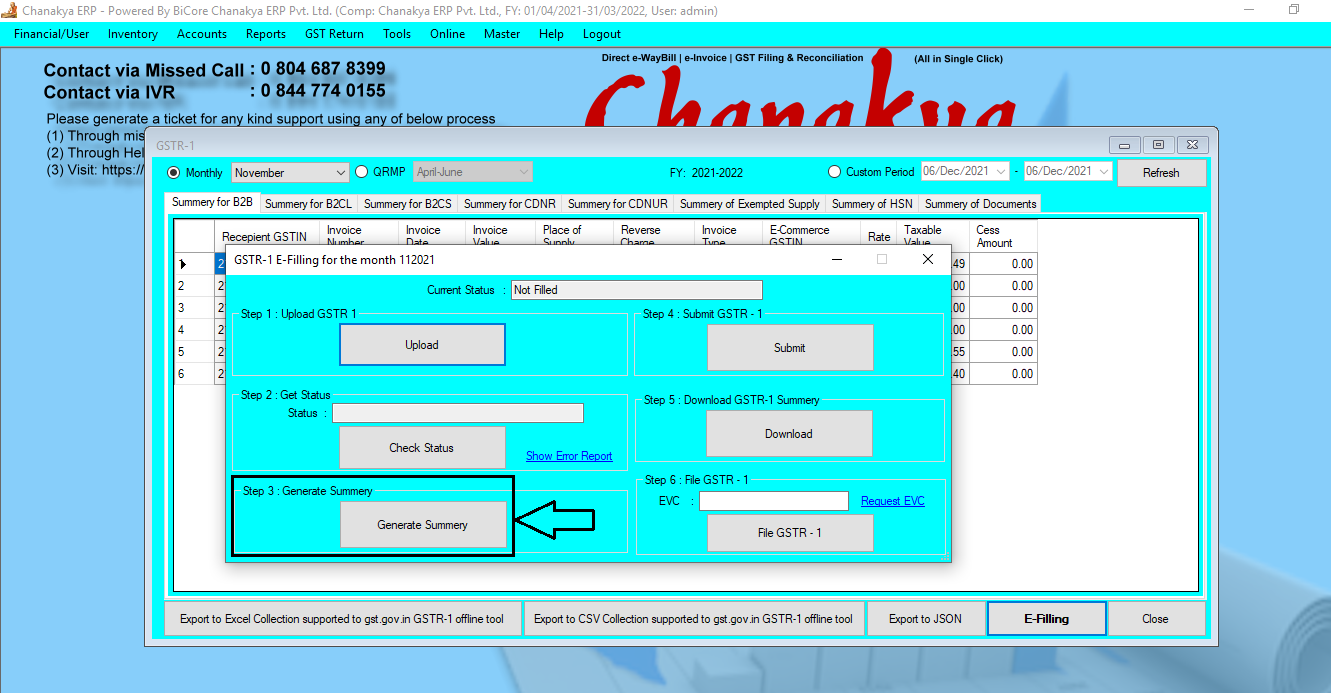
  GSTR1 Update According to GST Norms I n GSTR1 one Step has increased during filling i.e., "Generate Summary" which has been implemented in Chanakya ERP  After "Get Status", now Click on "Generate Summary" option to proceed further, as shown in below image For Filing step of GSTR1 you can visit to particular Blog "GSTR1 Filling Help Guide" Please Feel Free to Contact us on +91 8447740155  for any support/ Assistance Regarding GST Filing Thank You !

Chanakya ERP Update Release 1.1.1.2

Image
  Online Payment Module Implemented in Chanakya ERP Now Easily Renew AMC Through Online Payment by Following these Few Steps STEP 1:- Click on Help Menu to see the Module of Renew AMC, Click on Renew AMC STEP 2:- Click on Renew Now, A Pop-up will open which will show you the benefits of AMC Renewal and your Due date STEP 3:-  You will find the AMC Expiry date with Number of Years Renewal, According to that Pricing will Fetch, Click on Generate Order and Pay Online. STEP 4:-  Click on the Confirmation Message, If you want to Proceed for Transaction then Click on "Yes", If Not then "No" STEP 5:- Now you can see Order Information, where Order No, Order date, Order Value and Payment Link will fetch, You can Copy the Payment link and Paste to Your Desired Browser or directly Click on "Pay Now" button to Open the Link in Default Browser. NOTE:- You will get the Payment Link Via Email and SMS, where You Can Pay through Mobile also while Clicking on the Link. &qu

Chanakya ERP Update Release 1.1.1.1

  List of Enhanced Features for Support in ChanakyaERP Contact Via IVR :- 08447740155 Contact Via Miscall :- 08046878399 Please Generate a Ticket for any kind of support using any below process Through Miscall Using Registered Number Go to "Help Menu" in Software and Click on "Help Desk Direct Login" to Re-Direct page to your Default Browser Visit :-  https://helpdesk.chanakyaerp.in/ For More Query/Support, Feel free to Generate Ticket or Call us on +91 8447740155                                                   Thank You !

Credit Note and Debit Note in GST – Ultimate Guide for SMEs

Credit Note and Debit Note in GST – Ultimate Guide for SMEs From small trading businesses to large corporations when operating their concerns. These two different sizes of organizations regularly may face a problem that is common to both of them. And that problem is making errors in their invoices. To rectify this mistake, a document both these business verticals use is Credit Note and Debit Note. With the implementation of GST, like tax invoices and other documents, the credit and debit notes also have GST rules. Accordingly, the companies have to show them in the monthly GST Returns. So let’s understand more about Credit Notes and Debit Notes. What is a Credit Note? It is a document that the seller issues to the buyer due to an error in the invoice. Also, in the case of return of goods by the buyer to the seller results in Credit Invoice generation. Further, if we talk in terms of GST, the supplier only, if registered issues, a Credit Note. Additionally, the reason to issue the docum

Invoice B2C Vehicle Master Help Guide

Image
How To Create/Modify/Cancel Invoice B2C Vehicle in Chanakya ERP Create Invoice B2C Vehicle Bill Click  on  Inventory Vehicle Menu Click  on  Invoice B2C Vehicle A new window will popped up  Correspondence Address :- Fill Complete Address of Customer with Proper Mobile/Phone Number   Permanent Address:- If Permanent Address is Same as Correspondence Address then Simply Click on ">>" Key to fetch the details Vehicle Details:- In Vehicle details, You will Find the information of Vehicle  Frame Number:- Press "F12" to Select Frame Number of vehicle i.e., to be sold Engine Number:- Engine Number will be Fetched with Simply Selecting Frame Number. Key Number:- Key Number will be Mentioned (If Needed) Battery Number:- Enter the Battery Number (If Needed) Service Book Number:- Enter Service Book Number (if Required) Mfg. Date:- Enter the Mfg. Date Reg. No.:- Enter Reg. No. Model Code:- Model code will be fetched with frame Number Description:- Vehicle Name

User Wise Billing Group Mapping Help Guide

Image
How To Manage User Wise Billing Group Mapping in Chanakya ERP Go to Tools Menu You will Find an option of "User wise Billing Group Mapping" Open "User Wise Billing Group Mapping" Select " User" Select "Billing Group" Group which you want to allow Permission to Selected user to Work in. Click on "Add" Button to add the Mapping  If You want to Delete any Save Record, then Simply Press Delete Key to Delete that Particular Record For More Query/Support, Feel free to Generate Ticket or Call us on +91 8447740155 Thank you !

Chanakya ERP Update Release 1.1.1.0

  List of Enhanced Features in Update Release 1.1.1.0 Now  Customized Printing Format (Chargeable) is Available for Sales Bill (B2C & B2B) And too many performance improvement and minor updates. For More Query/Support, Feel free to Generate Ticket or Call us on +91 8447740155 Thank You !

Sales Order(B2B) Help Guide

Image
How to Create /Modify/Cancel a Sales Order(B2B) in Chanakya ERP Create Sales Order (B2B) Entry Click  on  Inventory Menu Click  on  sales Order (B2B) A new window will popped up  Enter  Your  Order Date  -  (Current Date) Purchase Number  will be Created  Automatically Billing Group will be selected by user (By clicking on Drop Down Button), as shown in below image Salesman details can be selected by Pressing "F12" on Salesman Box, A new Window will Pop-Up where all the Created List of Salesman will be fetched . Either Press "Enter Key" or Click on "Select Button" to fetch the details of Salesman, as shown in image below For Selecting Buyer details, Press "F12" to select Buyers Details from party List or Click on Three Dots (...) Beside Box to open party list, as shown in below image By Selecting Particular Buyers , Details will Automatically Fetch with A/c Balance in Cr./Dr. , as shown in below image You can also Create/Add New Buy

Chanakya ERP Update Release 1.1.0.9

  List of Enhanced Features in Update Release 1.1.0.9 In Party Master, Party Details will be Fetched Directly from Government GST Portal , If Party is Registered having GST number, Enter the GST Number and Download the details from Server Directly , No need to Enter all the details Manually In B2C Invoice,  While Entering GST number of Retailer Party his/her Details will Directly fetched from GST Portal Manual Invoice Number Entry in B2C and B2B Invoice, Specially Beneficial for E-Commerce Sellers  Billing Group Restrictions , User wise Mapping of Multiple Billing Groups Sales Order B2B , Now Generate Bill directly by fetching the Sales Order Details In B2B Invoice SMS Configuration , Now send a Message Copy to Admin   For More Query/Support, Feel free to Generate Ticket or Call us on +91 8447740155 Thank You !

Quotation Vehicle Help Guide

Image
How to Create/Modify/Cancel Quotation of Vehicle Entry in Chanakya ERP Create Quotation Click  on  Inventory Vehicle Menu Click  on Quotation A new window will popped up In Open Window You will find the Correspondence Address of Party/Customers , where you have to take the full details from Party/Customers to fill here in the Address Box, as shown in below image In Next Part you can Fetch the details of Vehicle from its Model Code , Description , Vehicle type , Color and Billing Details Will Auto fetch By Pressing "F12" key on "Model Code" , all Vehicle List will be Opened, Select the Vehicle from List, It's Details will be automatically fetched Here you can Manually Enter the Color and Some Billing details like Discount , Insurance Charge , Reg/Road Tax and H.P Charges , as shown in below image Select Purchase Type "Cash" or "Finance" , as shown in below image Click on "Save" Button to Save the Quotation "Print"

Purchase Vehicle Entry Help Guide

Image
How to Create/Modify/Cancel Purchase Vehicle Entry in Chanakya ERP Create Purchase Vehicle Entry Click  on  Inventory Vehicle Menu Click  on  Purchase A new window will popped up Enter  Your  Purchase Date  -  (Current Date) Purchase Number  will be Created  (Automatically & Manual Setting in  Document Number Settings  option) Enter  Your  Invoice Date (Date at which Invoice was Created by Supplier),  as shown in below image In the Supplier Text box   Press "F12"  to  Select  Party/Supplier  details, or  Click  on  Three Dots   (...)  to view the  Party/Supplier  List, you can also  Click  on  Plus  Button  (+)  to  Create   Party/Supplier   Master , as shown in below image Again new window will popped up with all your supplier list Select Supplier All the basic detail of your supplier will be full filled automatically . Invoice Type : Inter State Invoice  for  Out of State  ( IGST will be Applicable ) and  Intra State Invoice  for  Same State  ( CGST & SGST will be A