Posts

Showing posts from September, 2020

Item Master Help Guide

Image
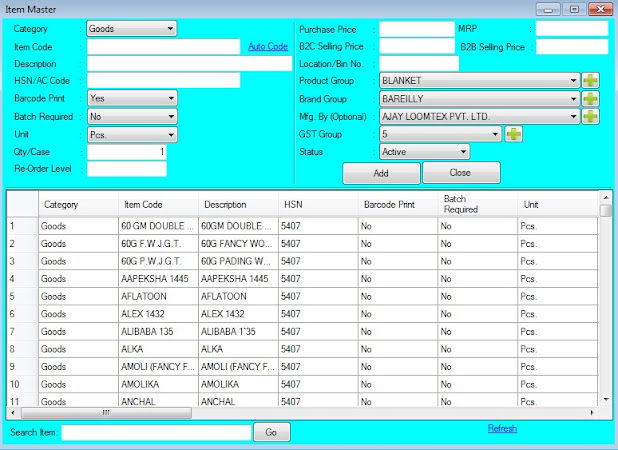
How to Create/Modify/Delete Item in Chanakya ERP Create Item Master Click on Item Master in Master Menu to open item master option as shown in below image. Enter/select appropriate value in field shown in above image. Description of each field is given below. (fields name marked with * are mandatory field.) Category (*): Select category of item from the list (Goods/Services) Goods : Stock/Inventory will be kept. Services : Stock/Inventory will not be kept. Item Code (*): An unique code of Item. It will also be considered as Barcode . Description : Description/Details of Item. HSN/AC Code: Enter HSN/SAC for the item or services. (Do not enter anything except HSN/SAC ) Barcode Print : Select " Yes " for print barcode sticker of item during purchase else select " No ". Batch Required: Select " Yes " for manage Batch Wise Stock of item (like pharma segment) else select " No ". Unit : Select unit for the item from list like Pcs./Kgs./Mtr./Pair

Search GST / Track Returns Help Guide

Image
How to Search GST No. and Track Returns in Chanakya ERP Search GSTIN Open Search GST Taxpayer window as shown in below image from Search GST link available in all window where you need to enter GSTIN like Party Master , Account Master . Now enter GSTIN and click on Search Button to Get All Details like name, address, registration type etc to verify you supplier and buyer. Track Return Click on Track Return Button in Search GST Taxpayer window as shown in above image to open Track Return window as shown in below image. Enter GSTIN, select Financial Year and click on Track Button to fetch all details of all returns filed by entered GSTIN with filling date, ARN number etc. as shown in below images. Author :   Mr. Dhiraj Kumar

Account Master Help Guide

Image
How to Create/Modify/Delete Account Master in Chanakya ERP     Create Account Master Click on  Account Master  in  Accounts  Menu to open account master option shown below. Enter/select appropriate value in field shown in above image. Description of each field is given below. (fields name marked with * are mandatory field.) Account Name (*) : Enter the account name. Account Group   (*) : Select account group as accounting norms. for create Sub/Secondary Account Groups click on "+" symbol besign account group field or press "F12" key on account group to open account group creation window. Contact Person  : Enter contact person name. Address  : Enter address. City  :  Enter city name . Pin Code  : Enter 6 digit pin code. District  : Enter district name. State   (*) : Select correct state name. GSTIN : Enter 15 digit valid GSTIN. To Check GSTIN on GST Server click on  Search GST . (this is optional) Opening Balance : Enter opening account balance in Dr./Cr. of star

Account Group Help Guide

Image
How to Create/Modify/Delete Account Group in Chanakya ERP Create Account Group Click on " + " Symbol beside Account Group option in  Account Master  or Press  F12  on Account Group option available in  Account Master  (reference image shown below.) to open Account Group Master window. Enter name of Group which you want to create. Select the Primary Account Group in which the sub account belong to, as per accounting norms. Select " Active " as status. Click on  Add  button or press  Enter Key  to create. Modify / Deactivate (Delete) Account Group. Click on " + " Symbol beside Account Group option in Account Master  or Press  F12  on Account Group option available in Account Master  (reference image shown below.) to open Account Group Master window. Double click  on account group which you want to  modify  or  deactivate  from the list as shown in below image. Then change the group name. To deacticate Account Group Status (*)  : Select  "Deactive"

Party Group Help Guide

Image
How to Create/Modify/Delete Party Group in Chanakya ERP Create Party Group Click on " + " Symbol beside Party Group option in Party Master or Press F12 on Party Group option available in Party Master  (reference image shown below.) to open Party Group Master window. Enter name of Group which you want to create. Select " Active " as status. Click on Add button or press Enter Key to create. Modify / Deactivate (Delete) Party Group. Click on " + " Symbol beside Party Group option in  Party Master  or Press  F12  on Party Group option available in  Party Master  (reference image shown below.) to open Party Group Master window. Double click  on party group which you want to  modify  or  deactivate  from the list as shown in below image. Then change the group name. To deacticate Party Group Status (*)  : Select  "Deactive"  as status for deactivate party group. Click on  Save  Button to save the changes. Author :   Mr. Dhiraj Kumar

Party Master Help Guide

Image
How to Create/Modify/Delete Party in Chanakya ERP      Create Party Click on Party Master in Master Menu to open party master option shown below. Enter/select appropriate value in field shown in above image. Description of each field is given below. (fields name marked with * are mandatory field.) Party Code   (*) : Enter an unique code for party which you want to create like 1,2,3 or short form of party name etc. Party Name (*) : Enter the name of party as their registered name like ABC Enterprises etc. Category   (*) : Select category of party from the list as below. Registered : To create party with GST Number. Unregistered : To create party without GST Number Party Type   (*) : Select Type of party as nature of transaction from the list as below. Buyer : If you are selling products/services to party. Supplier : If you are buying/purchasing products/services from party. Account Name   (*) : Account can be created automatically for entered party after entering party code &