Posts

Showing posts from July, 2021

Import B2C (Retail Bill) Invoices Vehicle Help Guide
Image
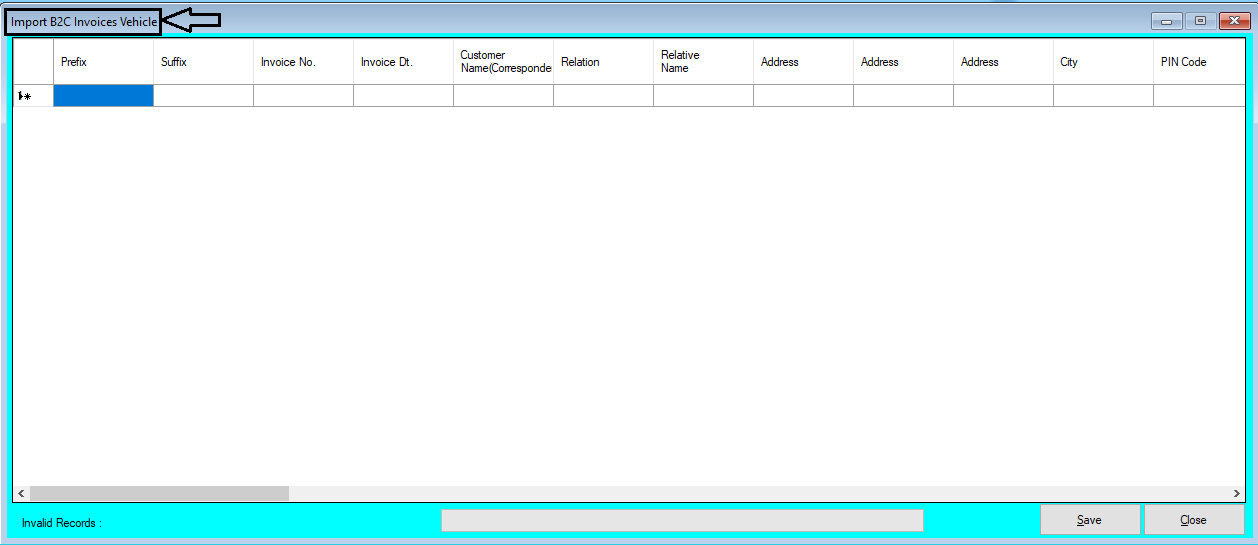
How to Import B2C (Retail Bill) Invoices Vehicle Through Excel in Chanakya ERP Import B2C (Retail Bill) Invoices Vehicle Click on  Import B2C Invoices Vehicle   in  Master Menu  to open Import B2C Invoices Vehicle option (as shown in below image) Invoices Maintained in  Excel  could be easily transferred through   "Copy and Paste"  option by  Right Click  on any Column to Paste data in  "Bulk"  (as shown in below image) After   Paste  of Invoices through  Excel,  data can be  Viewed  as shown in below image Error Remarks  can be viewed at  Remarks  column ( while scrolling Right to the screen ) and at the left bottom of the window, as shown in below image Note:   Invalid Invoice No.,Invalid Frame No., Etc..   error remarks which Could occur during Import of B2C Invoices Vehicle. For this type of error remarks you have to First  Create  all the Groups in software and Prepare Excel sheet according to  Import Format  provided   i n Software . After this You can Simply

Import Vehicle Opening Help Guide

Image
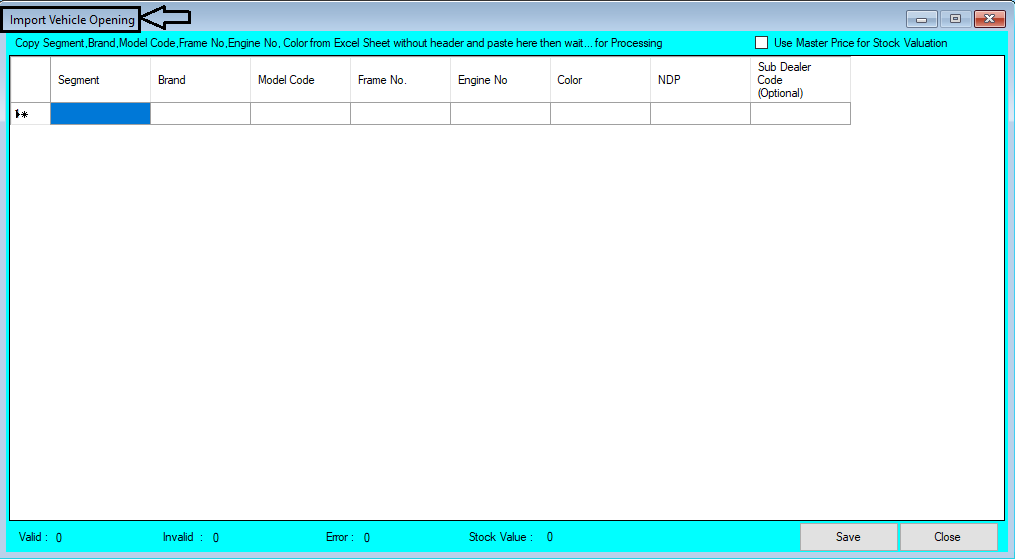
How to Import Vehicle Opening Through Excel in Chanakya ERP   Import Vehicle Opening  Click on  Import Vehicle Opening  in  Master Menu  to open Import Vehicle Opening option (as shown in below image) Data Prepared in  Excel  could be easily transferred through   "Copy and Paste"  option by  Right Click  option on any Column to Paste data in  "Bulk"  (as shown in below image) After   Paste  of data through  Excel,  data can be  Viewed  in this window and  Data analysis  can also be Track at  Bottom  side of window  (as shown in below image) Opening Stock value can  be Updated according to Vehicle Master Price i.e., set during Vehicle Master Entry, simply view   Right Corner  of the open window to  Click  the  Check-Box  (as shown in below image) Error Records  can be check at  Remarks  column ( while scrolling Right to the screen ), as shown in below image Note:   Invalid Sub Dealer Code or Any other  error which occur during import of Vehicle opening. For this type

Import Vehicle Master Help Guide

Image
How to Import Vehicle Master Through Excel in Chanakya ERP   Import Item Master Click on  Import Vehicle Master  in  Master Menu  to open Import Vehicle master option (as shown in below image) Data Prepared in  Excel  could be easily transferred through   "Copy and Paste"  option by  Right Click  option on any Column to  Paste  data in  "Bulk"  (as shown in below image) After   Paste  of data through  Excel,  data can be  Viewed  in this window and  Data analysis  can also be Track at  Bottom  side of window  (as shown in below image) Error Records  can be check at  Remarks  column ( while scrolling Right to the screen ), as shown in below image Note:  Invalid Value in Segment   and  Invalid GST Group  are common error which occur during import. For this type of error you can first  Create  these  Groups  in Software (Vehicle segment,  GST Group ). After Creation of these Groups You can Simply Paste the Excel Data here. Click  on  Save  button and the  Imported Vehi

Modify Vehicle Master List in Bulk like Excel Sheet Help Guide

Image
How to Modify Vehicle Master List in Chanakya ERP Modify Vehicle List (In Bulk) Click on  Modify Vehicle List  in  Master menu  to open Modify Vehicle list option (as shown in below image) Click  on any  Column/Row  which you want to  Edit  the  Information/Value  (as shown in below image) Every Information/Value is  Editable  with respect to Vehicle Master List. Any  Changes  here can be seen in Vehicle Master Menu and in whole software. Bulk  Vehicle List can be updated in  Single Window Click  on  Save  button. This message will be displayed.(as shown in below image)                                                                                       Click on  OK. For More Query/Support, Feel free to Generate Ticket or Call us on +91 8447740155 Thank You !

Vehicle Master Help Guide

Image
How to Create/Modify/Delete Vehicle Details in Chanakya ERP Create Vehicle Master Click on Vehicle Master in Master Menu to open Vehicle master option as shown in below image. Enter/select appropriate value in field shown in above image. Description of each field is given below. (fields name marked with * are mandatory field.) Vehicle Segment(*):  Select Vehicle Segment from the list Two Wheeler: For Two Wheeler Section Three Wheeler :  For Three Wheeler Section  Tractors:  For Tractor Section Four Wheeler:  For Four Wheeler Section Six Wheeler:  For Six Wheeler Section Brand (*) :  Select  Brand  for Vehicle Segment. Model Code (*) : Enter Model Code of Vehicle Segment Description (*) :   Description/Details of Vehicle Name Vehicle Type (*)  : Select Vehicle Type According to Vehicle Segment HSN Code:   Enter HSN for the item. (Do not enter anything except HSN) Horse Power : Enter Horse power of Vehicle Cubic Capacity : Enter cubic Capacity Seating Capacity : Enter Seating Capa

Schedule Drug Report Help Guide

Image
How to Check Report of Schedule Drug in Chanakya ERP Schedule Drug Report List  Note:- For Schedule Drug Report Enter the Product Group as "Narcotics" While Creating Item Master Regarding that Particular Item, Which is mainly related to Drug Medicine Click on  Schedule Drug Report   in  Reports Menu  to open Schedule Drug Report List option (as shown in below image) Group Selection option you will find here where You can Select "Product Group" as Created during Item Master time, as shown in below image You can Filter according to Date specified , which will Fetch data according to Specified Period of Time, as shown in below image While clicking on Show Button the detailed report will be fetched for specific period of time, as shown in below image Schedule Drug Report List can be  Exported  in  Excel  and  Text format  and send an   Email Attachment,   For more details of  Export  of file please go through our  Export Reports  Blog, where you will get a

Performa Invoice (B2B) Help Guide

Image
How to Create/Modify/Cancel Performa Invoice (B2B) in Chanakya ERP Create Performa Invoice (B2B) Click on  Performa Invoice (B2B)  in  Inventory Menu  to Open Performa Invoice (B2B) option (as shown in below image) Billing Groups: Multiple Billing Group can be selected by Clicking on Drop-Down Menu Invoice Number: Manually and Automatically both can be Managed in Document Number Settings Invoice Date: Invoicing Date is to be Selected , Date at which Invoice is being Generated Invoice Type: It will depend upon Address of Buyer (Inter-State Invoice for outside State Buyers and Intra-State Invoice for within State Buyers) Reverse Charge: By Default "No" will be Selected, You can Select "Yes" by Clicking on Drop-Down Menu A/c Balance: Previous A/c Balance will be displayed here of Particular Buyer's Payment Mode: "Cash" Mode for Cash Payment and "Credit" Mode for Later Payment. When Payment will be done by Buyer then their "P