Posts

Showing posts with the label Tools

Misc. Settings Help Guide

Image
How to Configure Extra/Miscellaneous Settings in Chanakya ERP Miscellaneous settings Click on Miscellaneous Settings  in Tools Menu  to open Miscellaneous Settings (as shown in below image) In Miscellaneous settings you will get various options according to your Firm/Company . You can Enable/Disable according to your need while using software for first time. Note: Whenever you are making Some Changes in Misc. Setting then You have To First Restart your Software (Logout and Login Again), then only Setting made will be Visible to Software GST Registration Type :- Firm/company can select GSTIN type  Regular :- If Registered in Regular type, Select Regular Composite :- If Registered in Composite type, Select composite. Business Segment: - Select Business Segment  Others :- Select other segment for all Business Type ( Except Pharma) Pharma :- Select Pharma for Medicine Businesses  Restaurant:- Select Restaurant for Restaurant Business ( KOT & Table w...

GST Portal Configuration in Chanakya Help Guide

Image
How to Configure GST portal to Chanakya ERP software  Chanakya ERP brings Filling of GST Return, Downloading and reconciliation of GST Reports without login gst.gov.in portal, for doing so we just configure your GST account once in Chanakya ERP. Let's See How it work login to gst.gov.in portal  after successfully login a new page will be opened where you got various options lik e Return Dashboard , Create Challan , View Notice and Order , Annual Return etc. from left hand side  choose View Profile  option A new web page will be opened where you will be able to see your detail in GST Portal Your Basic Detail(Profile),Place of Business, Contact, Other Business  Click "Manage API Access" From right Hand side Menu (Option)  A new web page (Manage API access ) will be opened Choose "Enable API Request" ->   "Yes"      Select Duration "6 hrs." Click on "CONFIRM" Button Now Login to your "Chanakya ERP" software Click on ...

Standard Vouchers Entry Help Guide

Image
How to Create/Modify/Delete Standard Voucher Entry in Chanakya ERP Standard Voucher Entry  (Create) Click on  Standard Voucher Entry   in  Accounts Menu  to open Standard Voucher Entry option (as shown in below image). You can Select Vouchers from Drop-Down List , which are used for Core Accounting with Voucher Number generated Automatically ( Which can be confugured through  Document Number Settings ), as shown in below image You can also Select Date for Any vouchers ( According to your Entry ), Narration Can be Mentioned in Narration Box (E.g., Cheque No. , Ref. Invoice No. Etc.) , Voucher Mode is By default Manual Mode, which is also  Editable (as shown in below image) You can also Print &   Preview Vouchers Before Printing and It could be Automatically Saved  (After Printing) or Click on Save button, If Vouchers Entry has gone wrong in that Case you can Click on   Refresh Button  or Completely Delete Vouchers, a...

Document Number Settings Help Guide

Image
How to Set Document Number for Invoices/Vouchers in Chanakya ERP Document Number Settings Click on Document Number Settings  in T ools Menu  to open Document Number Settings (as shown in below image) While Clicking on Document Column you will get Multiple Document option , Select Document/Invoices/Vouchers to Set Bill Number ( Prefix , Suffix , Digit in Number and Number Start From ) as shown in below image Select Document/Invoices from Drop-Down Menu, you can also Add Prefix and suffix with Total Digit in Number (Increase/Decrease according to your need) and Number starting format , you can also view the changes being done at below ( In Middle ) the same window (as shown in below image) You can also Select Number Mode option, you can Set Number Mode to Continuous Number (which will indicate your number in serial wise throughout software entry) as shown in below image Set Number Mode to Daily Revised Number (which will Revised your number on daily basis) For Example-...

Production/BOM Setting Help Guide

Image
How to Manage Production/BOM Setting in Chanakya ERP Production/BOM Settings Click on  Production/BOM Setting  in  Tools Menu  to open Production/BOM Setting option (as shown in below image) Press "F12" beside Finished Item List to Open Select Item Pop-Up window, where You can Select Item which you want to Add in Finished Item or Production Item, as shown in below image Select/Double Click on selected item to view the item in Finished Item menu, whose Production unit is to be prepared (as shown in below image) After Finished /Production item selection, Select BOM/Consumable Item from Item List to Prepare the Finished/Production Item (as mentioned in below image) Selected Item will Appear in Consumable Section , Enter Quantity of Items Required to complete One Finished Items and Click on Add button (as shown in below image) Consumable Item s will be displayed below in the empty area, you can Add Multiple Consumable Items for the specified Finished Items, as...

Data Freeze Settings Help Guide

Image
How to Freeze your Data in Chanakya ERP Data Freeze Settings Click on Data freeze in Tools Menu to open Data Freeze options (as shown in below image) Select Specific Date to Freeze the data till that specified Date, After Freezing the data No Modification will be done till that date. (as shown in below image) After Selecting  Specific Date , Click on Freeze button to Freeze your data till specified date (as shown in below image)  Click on OK or press Enter key to save and Current Status will be displayed on same window (as shown in below image) For More Query/Support, Feel free to Generate Ticket or Call us on +91 8447740155 Thank You !

Auto Backup Setup Help Guide

Image
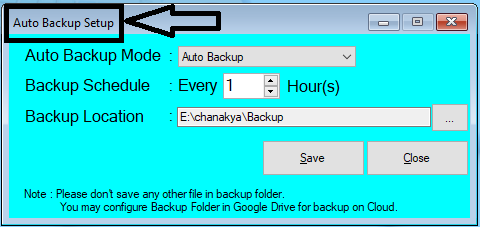
How to Take Auto Backup and Backup on Logout of Data in Chanakya ERP Auto Backup Setup Click on  Auto Backup Setup  in  Tools Menu  to open Auto Backup Setup option (as shown in below image) Click on Drop-Down Menu beside Auto Backup mode and select Auto Backup option in the list and then  Select Backup Schedule ( Specify Hour, so that software could take backup automatic according to specified Hour ) Click on the Three Dots (...) beside backup location to Select/Browse File from your system, where you can Save Backup File , as shown in below image Click on Save button to save the changes.  Backup on Logout   Click on  Auto Backup Setup  in  Tools Menu  to open Auto Backup Setup option (as shown in below image) Click   on   Drop-Down Menu   beside   Auto Backup mode   and select   Backup on Logout   option   in the list and   Select Backup Schedule  will be Off/Disable in t...

Applicable GST Settings (Composition Taxpayer) Help Guide

Image
How to apply composition GST slab on GST Group (For Composition Taxpayer) in Chanakya ERP Apply Applicable GST Rate (Composition GST) Click  on  Applicable GST settings  in  Tools Menu  to open Applicable GST settings option (as shown in below image) Select  on  GST Group  (which was created in  GST Group  section ) to apply GST % rate.(as shown in below image) Select GST Group from Drop-Down Menu and Apply Composition GST Scheme according to GST Group .(as shown in below image) Select Composite GST % according to Trade/Business (as shown in above image) Click on Save Button to see the Changes made.

Billing Group Help Guide

Image
How to Create/Modify/Delete Billing Group in Chanakya ERP Create Billing Group Click on Billing Group  in Tools Menu to open Billing Group Settings option (as shown in below image) Enter name of Group which you want to Create Select "Active" as status Click on "Add" button or Press Enter key to create Modify / Deactivate (Delete) Billing Group. Click  on  Billing Group Settings  in  Tools Menu  to open Billing Group Settings option (as shown in below image) Double click  on Billing group which you want to  modify  or  deactivate  from the list as shown in below image. Then change the group name. To deactivate Billing Group Status (*)  : Select  "Deactive"  as status for deactivate Billing group. Click on  Save  Button to save the changes

Printing Format and Barcode Settings Help Guide

Image
How to Set Printing Format for Invoice / Barcode and other documents in Chanakya ERP Apply Invoice Printing Format Click  on Printing Format   settings  in  Tools Menu  to open Printing Format settings option (as shown in below image) Click beside Document (written) to select the Invoice/Document Type for Setting Printer Format (as shown in below image) After Selecting Document/Invoice , Select Format while clicking beside Format Name (as shown in below image) Select Format of Document/Invoice (Invoice B2C) from various option available (i.e., A4, A5, POS and Many More ) as shown in below image Select  Format of  Document/Invoice (Invoice B2B) from various option available (i.e.,  A4, A5, POS, Letter Head Format  and  Many More ) as shown in below image After Selecting Format of Document/Invoice, Click on Save button to see the changes on specific Document/Invoice Barcode Format Setting Click  on  Printing Fo...