Stock Transfer In Help Guide
How to Create/Modify/Delete Stock Transfer IN in Chanakya ERP
Create Stock Transfer In
- Click on Stock Transfer In in Inventory Menu to open Stock Transfer In option (as shown in below image).
- Entry Number will be Created (Automatically or Manual Setting in Document Number Settings option), then Select Entry Date, Enter Stock Transfer (ST. No.) Number and Stock Transfer Date (ST Dt.) as shown in below image
- Press "F12" Key to Branch List or Press on Three Dot (...) to view the Branch List or Simply Click on (+) Button to open Party Master, as shown in below image
- Click on (+) Button to Open Party Master Creation for Branch, where you can Add your Branch details by Selecting Party Type as "Branch" as shown in below image
- Select Branch details from Branch List or Double Click on Branch Name to Select Particular Branch From which Stock is Coming as shown in below image
- On Item Code Enter Item First Digit or Enter (%) and Click on Enter Button to Open Select Item Window in which you can Select Item, as shown in below image
- Double Click or Click on Item and then Click on Select Button to Select Particular Item which is to be Accepted in One Branch from Another Branches the Item with Item code, Description, Units, Quantity, MRP, Rate, Amount and Batch No., MFG Date, Expiry Date for Medicine Transfer, as shown in below image
Modify Stock Transfer In List
- Press "F12" Key on Entry No. Column to Open/View Previous Stock Transfer In Details List as shown in below image
- Select/Double-Click on Stock Transfer In for Modification of that Particular Stock/Item, as shown in below image
- You can Edit/Modify Stock Transfer (Item Name, Quantity, Rate, Amount) and Click on Save Button to Save the Modify Details, as shown in below image
Cancel/Delete Stock Transfer In
- Press "F12" Key on Entry No. Column to Open/View Previous Stock Transfer In List as shown in below image
- Select/Double-Click on Stock Transfer In List for Modification of that Particular Stock, as shown in below image
- Right-Click with your Mouse on Any Blank Area (Color Area) where you will get option for "Cancel Stock Transfer In" as shown in below image
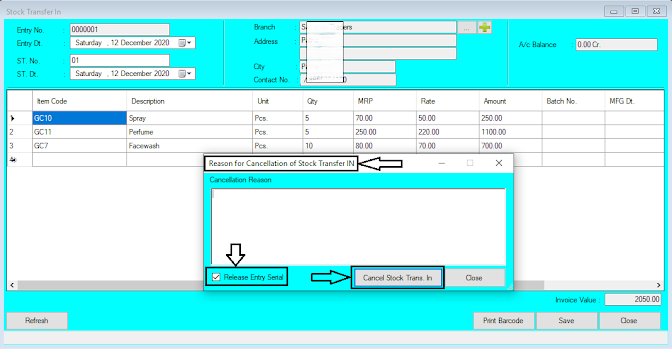
- After Clicking on "Cancel Stock Transfer In" Button a New Pop-Up Window will open which will ask "Reason of Cancellation of Stock Transfer In" you will have to provide Reason of Cancel/Delete in Message Box, If you have to Release Entry Serial Number then Select Check Box (By default Check Box is Selected), if not then Uncheck the Box and then Click on "Cancel Stock Transfer In" button, as shown in below image
- "Successfully Stock Transfer IN Cancelled" Message will display on screen and Click on OK button to proceed Further
Thank You !


Comments
Post a Comment