Purchase Entry Help Guide
How to Create/Modify/Cancel Purchase Entry in Chanakya ERP
Create Purchase Entry
- Click on Inventory Menu
- Click on Purchase
A new window will popped up
- Enter Your Purchase Date - (Current Date)
- Purchase Number will be Created (Automatically & Manual Setting in Document Number Settings option)
- Enter Your Invoice Date (Date at which Invoice was Created by Supplier), as shown in below image
- P.O (Purchase Order) Number (If Created then Press "F12" key to View and Select P.O Number), as shown in below image
- You can also Click on View P.O details to View the Items added in Particular Selected P.O (Purchase Order) as shown in below image
In the Supplier Text box
- Press "F12" to Select Party/Supplier details, or Click on Three Dots (...) to view the Party/Supplier List, you can also Click on Plus Button (+) to Create Party/Supplier Master, as shown in below image
Again new window will popped up with all your supplier list
- Select Supplier
All the basic detail of your supplier will be full filled automatically .
- In Reverse Charge Option Choose Yes (If applicable)
Note :-Normally seller collects GST from Buyer and Pays to Government. However, In some cases, Buyer Pay GST Directly to Government, This is Called Reverse Charge in GST
In Normal Billing, Reverse Charge Should Be No
- Choose Payment Mode : Cash Or Credit.
- Invoice Type : Inter State Invoice for Out of State (IGST will be Applicable) and Intra State Invoice for Same State (CGST & SGST will be Applicable)
- Godown : You can Select Multiple Godown (If Applicable in your Business)
- In Item Code Enter Item code of Item (if remember) or Enter "First letter of description" about your product and press "Enter Button" your item will be listed in new window.
- Enter % and press "Enter Button" all your item will be listed in new popped up window, as per shown in picture below
- Select Item from List and Press "Enter Button" or Click on "Select" Button.
- Enter Quantity
For adding more item do the same process
- Click on "Print Barcode" for printing Item wise Barcode (According to Total Quantity Barcode will be Printed, only you have to attach Barcode Printer to System and Configure Barcode Setting in Document Number Settings)
- Click on "Save" button to save your Purchase Bill and that Item will be Added to your Stock
- You can Add Shipping/Transport Details (If Any) with Transport Mode, Transport Name, Freight Charges with Other Details and Click on OK button, as shown below in image
Note: IT TCS charge, Cess Charge and Overall Discount can be Mentioned during Purchase Bill
- After Clicking on Save Button, a Message will be Displayed on Screen " Successfully Saved" with Purchase Number, as shown in below image
Note: In Tools Section open Misc. Settings there Select Business Segment as "Pharma" and Save it and Restart the Software (Logout & Login One Time)
- In Medicine Business "Cases","Bonuses", "Batch Number", "Expiry Date" & "Mfg. Date" are Important Parts which will Open in Purchase Section, as shown in below images
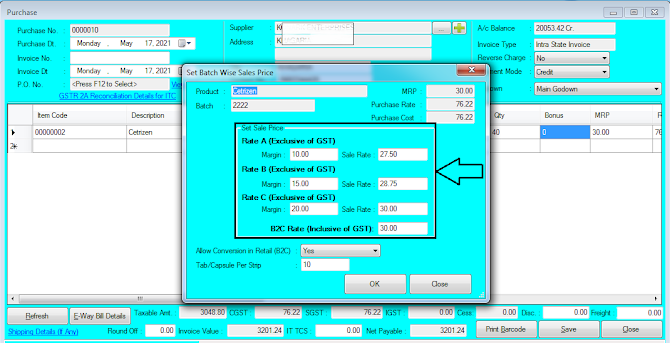
- While Pressing "F10" key on any column of selected item, a Pop-up window of "set Batch wise Sales Price" as shown in below image
- You can Set here the B2B sale rate margin (3 Types of Margin % can be set) and for B2C sale rate pricing (Amount) can be set Inclusive GST, as shown in below image
- You can also Set Conversion option in B2C sale (Retail) and Define Tablet/Capsule per strip option, that will Impact directly on Retail sell bill/Invoice, Click on OK button to see the impact, as shown in below image
- Press "F12" key on Purchase Number to Open Previous Purchase Invoice List, Select/Double-Click to Open Particular bill in Modify Mode, as shown in below image
- Selected Purchase bill will Open in details, You can Modify any part of the Bill and Save it after Modification, as shown in below image
- After Successful Modification of Particular Bill, a Message will be Displayed on Screen "Successfully Purchase Modified" , as shown in below image
Cancel Purchase Entry
- Press "F12" key on Purchase Number to Open Previous Purchase Invoice List, Select/Double-Click to Open Particular bill in Modify Mode, as shown in below image
- Right-Click with your Mouse on Any Blank Area (Color Area) where you will get option for "Cancel Purchase" as shown in below image
- After Clicking on "Cancel Purchase" Button a New Pop-Up Window will open which will ask "Reason of Cancellation of Purchase" you will have to provide Reason of Cancel/Delete in Message Box, If you have to Release Invoice Serial Number then Select Check Box (By default Check Box is Selected), if not then Uncheck Check Box and then Click on "Cancel Purchase" button, as shown in below image
- After Clicking on "Cancel Purchase" of Particular Bill, a Message will be Displayed on Screen "Successfully Purchase Cancelled" , as shown in below image


Comments
Post a Comment