Party Master Help Guide
How to Create/Modify/Delete Party in Chanakya ERP
Create Party
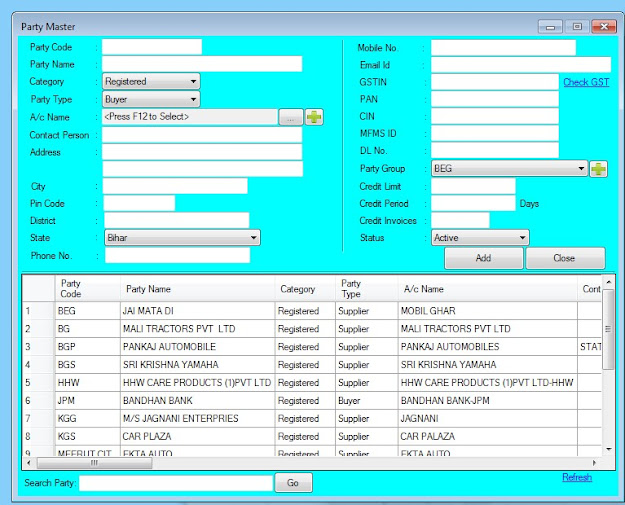
- Click on Party Master in Master Menu to open party master option shown below.
- Enter/select appropriate value in field shown in above image.
- Description of each field is given below. (fields name marked with * are mandatory field.)
- Party Code (*): Enter an unique code for party which you want to create like 1,2,3 or short form of party name etc.
- Party Name (*): Enter the name of party as their registered name like ABC Enterprises etc.
- Category (*): Select category of party from the list as below.
- Registered : To create party with GST Number.
- Unregistered : To create party without GST Number
- Party Type (*): Select Type of party as nature of transaction from the list as below.
- Buyer : If you are selling products/services to party.
- Supplier : If you are buying/purchasing products/services from party.
- Account Name (*): Account can be created automatically for entered party after entering party code & party name by clicking on "+" plus symbol. or account can be selected from Account Master (in case of account mapping with existing account) by pressing "F12" key on account name field or by clicking on "..." triple dot. (In normal cases, we recommend to create account automatically by clicking on "+" Plus Symbol.)
- Contact Person : Enter contact person name.
- Address : Enter address.
- City : Enter city name.
- Pin Code : Enter 6 digit pin code.
- District : Enter district name.
- State (*): Select correct state name. (Note: wrong selection of state will apply wrong GST during transaction and reports.)
- Phone No. : Enter Phone No.
- Mobile No. : Enter 10 digit valid Mobile No. (Mobile Number will be used for auto SMS, if enabled.)
- GSTIN (* - if category is registered): Enter 15 digit valid GSTIN. To Check GSTIN on GST Server click on Search GST.
- PAN No. : Enter PAN No. of party.
- CIN : Enter CIN No. of party, if party is registered under MCA like Pvt. Ltd. or LLP.
- MFMS Id : Enter MFMS ID (Only for Fertilizer dealer.)
- DL No. : Enter Drug Licence No. (Only for Medicine Businesses)
- Party Group (*): Select Group for Party. To Create New Party Group Click on "+" Symbol or Press "F12" Key of Party Group Box.
- Credit Limit : Enter credit limit of party for generate alert during invoice.
- Credit Period : Enter credit period of party.
- Credit Invoices : Enter allowed credit invoices.
- Status (*) : Select "Active" as status for create new party.
- Now Click on "Add" Button to create this party.
- When party will successfully created then a message will appear like below image.
- Click on any button.
- Yes : To refresh party list
- No : Continue without refreshing party list.
Modify / Deactivate (Delete) Party
- Click on Party Master in Master Menu to open party master option shown below.
- Double click on party which you want to modify or deactivate from the list as shown in above image. Party can be also searched through search party option.
- Then change the value as per requirement/need.
- To deacticate Party
- Status (*) : Select "Deactive" as status for deactivate party for transaction & reporting.
- Click on Save Button to save the changes.
- When party will successfully created then a message will appear like below image.
- Click on any button.
- Yes : To refresh party list
- No : Continue without refreshing party list.
Author : Mr. Dhiraj Kumar


Comments
Post a Comment