Invoice B2C Help Guide
How to Create/Modify/Cancel Invoice B2B in Chanakya ERP
Create Invoice B2C Bill
- Click on Inventory Menu
- Click on Invoice B2C
A new window will popped up

- Select Billing Groups (If Multiple Counter is Maintained in Business)
- Invoice Number will be Created (Automatically & Manual Setting in Document Number Settings option)
- Enter Your Invoice Date - (Current Date)
- Invoice Type : Inter State Invoice for Out of State (IGST will be Applicable) and Intra State Invoice for Same State (CGST & SGST will be Applicable)
- Salesman: Press "F12" to Select Salesman from Salesman List
- In Reverse Charge Option Choose "No"👇👇👇
In Normal Billing, Reverse Charge Should Be "No"
- Godown : You can Select Godown from which Sale is Being Processed, Mainly Main Godown is Selected (Multiple Godown cases, If Applicable in your Business) as shown in below image
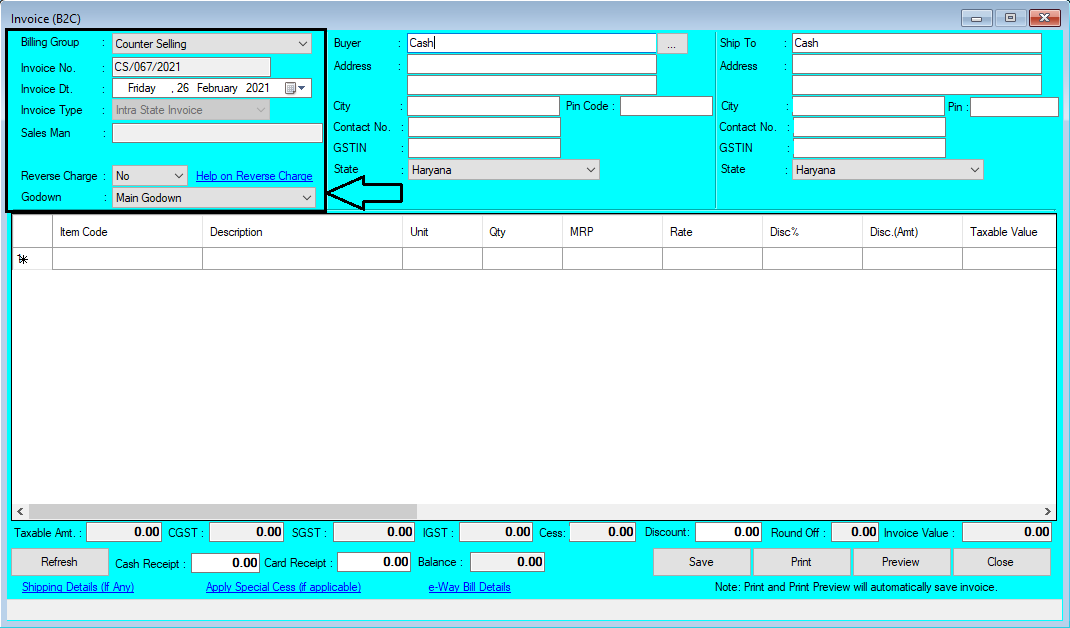
- Buyers: By Default "Cash" will be Selected, You can Edit Name of Retail Customer and Fill other Details like Address, City, Pin code, Contact Number and GSTIN

- Click on Three Dot (...) or Press "F12" Key to Open Retail Customer List where you can Select Previous Retail Customer List, as shown in below image

- If "Ship To" Details will be same as Buyers details, It will be Automatically Fetched when Buyers Details is Added, and in some Cases Addresses are different then You can Add "Ship To" Details Different from Buyer Details,as shown in below image

- In Item Code Enter Item code of Item (if remembered) or Enter "First letter of description" about your product and press "Enter Button" your item will be listed in new window. OR
- Enter (%) Sign and Press "Enter Button" all your item will be listed in New Pop-up Window, as per shown in Image below OR
- If You are Using Barcode Scanner while Billing, then Simply Scan the Barcode of that Particular Item and it Will be Automatically Fetched through Barcode Reader.

- Select Item from List and Press "Enter Button" or Click on "Select" Button.
- You can use Down Arrow (↓) and Up Arrow (↑) Key to select Products/Items
- Enter Quantity
For adding more item do the same process
- Taxable Amount, GST applicable (CGST & SGST or IGST), Cess charge, Overall Discount & Round Off will Calculate Invoice Value.
- Payment Mode is Cash Receipt & Card Receipt, Enter the Amount of Total Invoice Value or You can Set Auto Cash Receipt Setting in Misc. Settings.
- Print & Preview Option will Auto save the Bill while Save Button will Manually Save the bill, as shown in below image

- Press "F11" Key to "Open Additional Details" Option where You can Add Model No., Serial No., Brand and Warranty details, You can also "Add Service Description", Click on OK button to Show this Additional Details on bill, as shown in below image

- Press "F10" Key a Message will display "Do you want to add this Item in Sort order List?", "Yes" & "No", If "Yes", Particular Item will be Added in Sort Order List of "Purchase Order", where You can make Purchase order of that Particular Item, as shown in below image

- Press "F9" Key to "View Item Information", in which you will find that Particular Item details, Last Purchase Price, Last Sale Price, Profit (In %) & Profit(In Rs.), as shown in below image

- Press "F8" to open Change GST Rate window, where you can Apply New GST Rate at Particular Product, as shown in below image

- Press "F7" to Open Salesman List, from where you can Select Salesman for that Particular Invoice, as shown in below image

- Click on Shipping Details (If Any) to Open Shipping/Transport Details, Add the following Details Click on OK Button to Save the Information in Particular Bills, as shown in below image

- Click on Apply special Cess (If Applicable) to Open Enter Special CESS Window, in which you can Set Special CESS in Percentage and Click on OK Button to Apply Following CESS % in that Particular Bill, as shown in below image

- You can View Particular Item/ Product Stock at Bottom Left Corner of Window, as shown in below image

- If you want to change MRP of Particular Item during Invoice B2C then Simply type Amount in MRP section and Click Enter Button, a Message will be displayed "Do you want to update Rate According to MRP?", "Yes" will update Rate (Invoice B2C Price) according to MRP and "No" will only update MRP, as shown in below image

- If you want to change Rate (Invoice B2C Price) Without GST then Click on "Yes" New Rate will be Excluded GST (4017.86 + 18% GST = 4500), "No" for Adding GST after Price Value, as shown in below image

- Click on Save Button to Save the Particular Bill, a message will be displayed on Screen "Successfully Saved with Invoice No.", as shown in below image

- At Bottom of Window After Save Button, there are Option of "Print" and "Preview" of Particular Invoice.
- While Clicking on Print Button, Print of that Particular Invoice will be Printed out by Default Printer (Printer which is installed to that particular System), and automatically it will also "Save the Invoice"
- While Clicking on Preview Button you will get option of Viewing the bill before Printing, You can Preview the Invoices and Particular Invoices can be Exported in Multiple Extension and can also be Send as an Attachment File through Email as shown in below image

Note: In Tools Section open Misc. Settings there Select Business Segment as "Pharma" and Save it and Restart the Software (Logout & Login One Time)
- Number of Options will be Enabled Like, Referred By will be Enabled where you can mentioned Doctor's details, Press "F12" to Open Doctor List, Select Doctor Name from the List, If Name Not Found then Create Doctor Master By clicking Again "F12" Key
- Batch Number, Cases according to Quantity, Bonus Entry (Scheme Option) will be enabled, as shown in below image

- Scroll Right to View More Options for Medical Segment Like Mfg. Date and Expiry Date will be visible, as shown in below image

- In Item Code Enter Item code of Item (if remembered) or Enter "First letter of description" about your product and press "Enter Button" your item will be listed in new window.
- Enter % and press "Enter Button" all your item will be listed in new popped up window, as per shown in picture below

- Select Item from List and Press "Enter Button" or Click on "Select" Button.
- You can use Down Arrow (↓) and Up Arrow (↑) Key to select Products/Items
- Enter Quantity
- Batch Wise Sale option will be open when Batch will be Selected (If Previous Batch has been changed), you can select from Open Batch List from Pop-Up Window, as shown in image below
- Selecting Batch Number will Automatically Fetched Mfg. Date and Expiry Date

- Press "F12" Key on Quantity option, You will find the Option of "Medicine Strip Break", In which you will find to Add Strip Quantity and Table/Capsule Option, as shown in below image

Note: In Tools Section open Misc. Settings there Select Business Segment as "Restaurant" and Save it and Restart the Software (Logout & Login One Time)
For Restaurant Business Segment
- KOT options will be Enabled while Billing Invoice B2C
- "Select KOT" while Billing/Invoice B2C,as shown in below image

- "Select KOT" will Open a Window where You will get option of Selecting KOT according to Table Wise (Select From Multiple Table, Whose KOT is to converted in Invoice)
- If Single Table Multiple Bills Entry is there then you can "Select Table Share Remark" (Which is to be Entered while Making KOT of that Person on same Table, you can use any Identification to Differentiate his Presence)
- Click on "Show KOT s"

- While Selecting Table, All bill will be Viewed (Multiple Bills, Means Sharing Table), Add KOT option will be Visible at each Bill, Click on "Add KOT" for making that Particular KOT Invoice, as shown in below image

- While Clicking on "Add KOT", that Particular KOT will be Listed in "Selected KOT List" and Particulars Item in that KOT will be Listed in "Item List (Quantity of same items from Multiple KOT(s) will be merged)"
- After that Click on "Continue" Button, as shown in below image

- After Clicking on "Continue" button, Item will be Added in Invoice B2C and KOT windows will be Closed Automatically
- Click on Save button to Save the Invoice
- Click on "Preview" Button to Preview the Invoice and Print, Import the Bill in Various Format
- Click on "Print" Button to Print Invoice by Default Printer attached to System

- At the time of Creating Bill/Invoice, you can also Preferred KOT and Bill/Invoice Both in same window from different Printer (First KOT Print option will be asked then After Invoice/Bill Print Option will flashed in Same Window)

Note: In Tools Section open Misc. Settings there Select Business Segment as "Others" and "Enable" the Fold Management and Save it and Restart the Software (Logout & Login One Time)
For Garments/Textile Business(Fold Management)
- "Enable" Fold Management and "Enable" Rate Wise GST Slab (MRP/Sale Price<=1000:5% GST & MRP/Sale Price > 1000:12%) in Misc. Settings in Tool Menu Section

- After "Enabling" Fold Management, You will see in Invoice B2C (Fold and Fold Quantity) is active with Total Quantity (Calculated as Fold X Fold Quantity = Quantity) as shown in below image

- GST will be Calculated Automatically after Enabling Rate Wise GST Slab in Misc. Setting, It will be Fetched according to the Sale Rate/MRP, as shown in below image

Modify B2C Invoice
- Open Invoice B2C in Inventory Menu
- Press "F12" Key on Invoice Number to Open Invoice B2C List, in Pop-Up Window where You can Find all Previous Invoices.
- Invoices Which you want to Modify/Edit, then Select/Double-Click on Particular Invoice to Open in Modify Mode , as shown in below images

- Selected Invoice will be Opened in Modify mode to Edit any part of Invoices, After Editing/Modifying Invoices, Click on Save Button to Save the Modify changes in the bill, as shown in below image

- After Saving the Invoices, a Message will be displayed "Successfully Invoice Modified", Click on OK Button, as shown in below image

Cancel Invoice B2C
- Open Invoice B2C in Inventory Menu
- Press "F12" Key on Invoice Number to Open Invoice B2C List, in Pop-Up Window where You can Find all Previous Invoices.
- Invoices Which you want to Modify/Edit, then Select/Double-Click on Particular Invoice to Open in Modify Mode , as shown in below images

- Selected Invoice will be Opened in Modify mode, Right Click on Blank Color Area (Color), "Cancel Invoice" Message will be viewed, as shown in below image

- After Clicking on "Cancel Invoice B2C" Button a New Pop-Up Window will open which will ask "Reason of Cancellation of Invoice B2C" you will have to provide Reason of Cancel/Delete in Message Box, If you have to Release Invoice Serial Number then Select Check Box (By default Check Box is Selected), if not then Uncheck the Check Box and then Click on "Cancel Invoice" button, as shown in below image

- After Clicking on "Cancel Invoice" of Particular Bill, a Message will be Displayed on Screen "Successfully Invoice Cancelled" , as shown in below image

For More Query/Support, Feel free to Generate Ticket or Call us on +91 8447740155
Thank You !


Comments
Post a Comment