Vehicle Master Help Guide
How to Create/Modify/Delete Vehicle Details in Chanakya ERP
Create Vehicle Master
- Click on Vehicle Master in Master Menu to open Vehicle master option as shown in below image.
- Enter/select appropriate value in field shown in above image.
- Description of each field is given below. (fields name marked with * are mandatory field.)
- Vehicle Segment(*): Select Vehicle Segment from the list
- Two Wheeler: For Two Wheeler Section
- Three Wheeler: For Three Wheeler Section
- Tractors: For Tractor Section
- Four Wheeler: For Four Wheeler Section
- Six Wheeler: For Six Wheeler Section
- Brand (*): Select Brand for Vehicle Segment.
- Model Code (*) : Enter Model Code of Vehicle Segment
- Description (*) : Description/Details of Vehicle Name
- Vehicle Type (*) : Select Vehicle Type According to Vehicle Segment
- HSN Code: Enter HSN for the item. (Do not enter anything except HSN)
- Horse Power : Enter Horse power of Vehicle
- Cubic Capacity : Enter cubic Capacity
- Seating Capacity : Enter Seating Capacity
- Type Body : Enter Type of Body
- Fuel used : Enter Fuel Used (Petrol/Diesel/CNG/Electric)
- No. of Cylinders : Enter No. of Cylinders
- Gross Weight : Enter Gross Weight
- Unladen Weight : Enter Unladen Weight
- Purchase Price : Enter Purchase Price (Exclusive Price)
- Ex. Showroom Price : Enter Ex. Showroom Price
- GST Group (*) : Select GST Group for Item to apply correct GST on item during transaction. To Create New GST Group Click on "+" Symbol or Press "F12" Key of GST Group Box. (To Apply correct GST Rate on GST Group use Applicable GST Settings)
- Status (*) : Select "Active" as status for create new Vehicle.
- Now Click on "Add" Button to create this item.
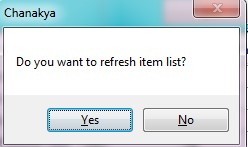
- When item will successfully created then a message will appear like below image.

- Click on any button.
- Yes : To refresh item list
- No : Continue without refreshing item list.
Modify / Deactivate (Delete) Item.
- Click on Vehicle Master in Master Menu to open Vehicle master option shown below.
- Double click on item which you want to modify or deactivate from the list as shown in above image. Item can be also searched through search item option.
- Then change the value as per requirement/need.
- To deactivate Item
- Status (*) : Select "Deactive" as status for deactivate item for transaction & reporting.
- Click on Save Button to save the changes.
- When Vehicle Name will successfully created then a message will appear like below image.

- Click on any button.
- Yes : To refresh item list
- No : Continue without refreshing item list
For More Query/Support, Feel free to Generate Ticket or Call us on +91 8447740155
Thank You !


Comments
Post a Comment