Purchase Vehicle Entry Help Guide
How to Create/Modify/Cancel Purchase Vehicle Entry in Chanakya ERP
Create Purchase Vehicle Entry
- Click on Inventory Vehicle Menu
- Click on Purchase
A new window will popped up

- Enter Your Purchase Date - (Current Date)
- Purchase Number will be Created (Automatically & Manual Setting in Document Number Settings option)
- Enter Your Invoice Date (Date at which Invoice was Created by Supplier), as shown in below image

In the Supplier Text box - Press "F12" to Select Party/Supplier details, or Click on Three Dots (...) to view the Party/Supplier List, you can also Click on Plus Button (+) to Create Party/Supplier Master, as shown in below image
Again new window will popped up with all your supplier list
- Select Supplier
All the basic detail of your supplier will be full filled automatically .- Invoice Type : Inter State Invoice for Out of State (IGST will be Applicable) and Intra State Invoice for Same State (CGST & SGST will be Applicable)
- A/c Balance: Auto A/c Balance can be Fetched by Selecting Party Details

- In Item Code Enter Item code of Item (if remember) or Enter "First letter of Model Code" of your product and press "Enter Button" your item will be listed in new window.
- Enter % and press "Enter Button" all your item will be listed in new popped up window, as per shown in picture below

- Select Vehicle from List and Press "Enter Button" or Click on "Select" Button.
- Enter Model code, Frame Number,Engine Number,Color & Taxable Value
For adding more item do the same processYour Taxable Amount, GST Amount(IGST or CGST+SGST) Total Payable Amount Round Off will show bellow as per show in picture below- Click on "Save" button to save your Purchase Bill and that Item will be Added to your Stock

Note: IT TCS charge can be Mentioned during Purchase Bill- After Clicking on Save Button, a Message will be Displayed on Screen " Successfully Saved" with Purchase Number, as shown in below image

Modify Purchase Entry
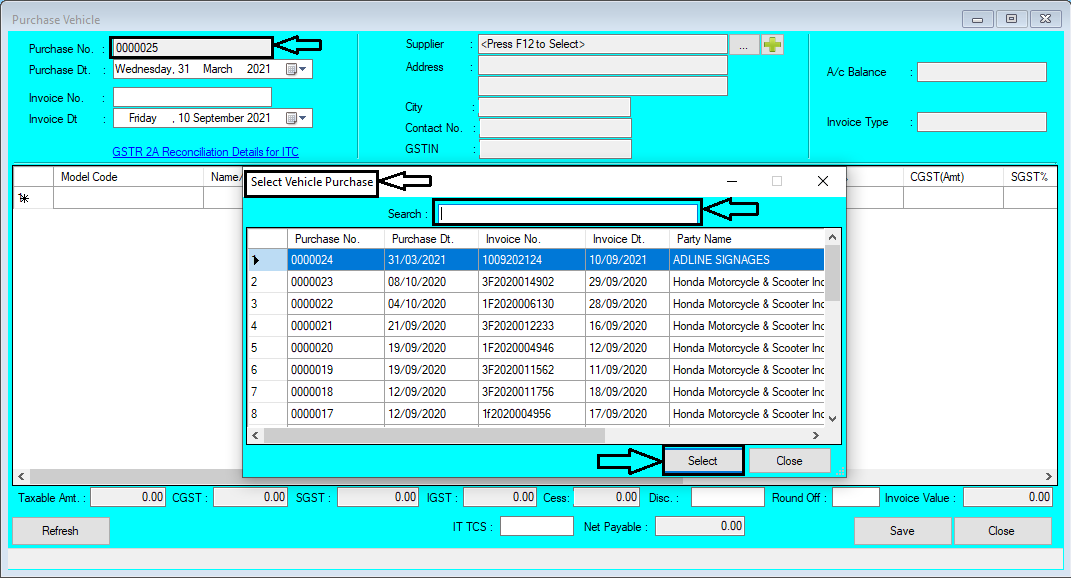
- Press "F12" key on Purchase Number to Open Previous Purchase Invoice List, Select/Double-Click to Open Particular bill in Modify Mode, as shown in below image

- Selected Purchase bill will Open with details, You can Modify any part of the Bill and Save it after Modification, as shown in below image

- After Successful Modification of Particular Bill, a Message will be Displayed on Screen "Successfully Purchase Modified" , as shown in below image
- Click on Inventory Vehicle Menu
- Click on Purchase
A new window will popped up

- Enter Your Purchase Date - (Current Date)
- Purchase Number will be Created (Automatically & Manual Setting in Document Number Settings option)
- Enter Your Invoice Date (Date at which Invoice was Created by Supplier), as shown in below image

In the Supplier Text box
- Press "F12" to Select Party/Supplier details, or Click on Three Dots (...) to view the Party/Supplier List, you can also Click on Plus Button (+) to Create Party/Supplier Master, as shown in below image
Again new window will popped up with all your supplier list

- Select Supplier
All the basic detail of your supplier will be full filled automatically .
- Invoice Type : Inter State Invoice for Out of State (IGST will be Applicable) and Intra State Invoice for Same State (CGST & SGST will be Applicable)
- A/c Balance: Auto A/c Balance can be Fetched by Selecting Party Details

- In Item Code Enter Item code of Item (if remember) or Enter "First letter of Model Code" of your product and press "Enter Button" your item will be listed in new window.
- Enter % and press "Enter Button" all your item will be listed in new popped up window, as per shown in picture below

- Select Vehicle from List and Press "Enter Button" or Click on "Select" Button.
- Enter Model code, Frame Number,Engine Number,Color & Taxable Value
For adding more item do the same process
- Click on "Save" button to save your Purchase Bill and that Item will be Added to your Stock

Note: IT TCS charge can be Mentioned during Purchase Bill
- After Clicking on Save Button, a Message will be Displayed on Screen " Successfully Saved" with Purchase Number, as shown in below image

- Press "F12" key on Purchase Number to Open Previous Purchase Invoice List, Select/Double-Click to Open Particular bill in Modify Mode, as shown in below image

- Selected Purchase bill will Open with details, You can Modify any part of the Bill and Save it after Modification, as shown in below image

- After Successful Modification of Particular Bill, a Message will be Displayed on Screen "Successfully Purchase Modified" , as shown in below image

Cancel Purchase Entry
- Press "F12" key on Purchase Number to Open Previous Purchase Invoice List, Select/Double-Click to Open Particular bill in Modify Mode, as shown in below image

- Right-Click with your Mouse on Any Blank Area (Color Area) where you will get option for "Cancel Purchase" as shown in below image

- After Clicking on "Cancel Purchase" Button a New Pop-Up Window will open which will ask "Reason of Cancellation of Purchase" you will have to provide Reason of Cancel/Delete in Message Box, If you have to Release Invoice Serial Number then Select Check Box (By default Check Box is Selected), if not then Uncheck Check Box and then Click on "Cancel Purchase" button, as shown in below image

- After Clicking on "Cancel Purchase" of Particular Bill, a Message will be Displayed on Screen "Successfully Purchase Cancelled" , as shown in below image
For More Query/Support, Feel free to Generate Ticket or Call us on +91 8447740155
Thank You !
- Press "F12" key on Purchase Number to Open Previous Purchase Invoice List, Select/Double-Click to Open Particular bill in Modify Mode, as shown in below image
- Right-Click with your Mouse on Any Blank Area (Color Area) where you will get option for "Cancel Purchase" as shown in below image

- After Clicking on "Cancel Purchase" Button a New Pop-Up Window will open which will ask "Reason of Cancellation of Purchase" you will have to provide Reason of Cancel/Delete in Message Box, If you have to Release Invoice Serial Number then Select Check Box (By default Check Box is Selected), if not then Uncheck Check Box and then Click on "Cancel Purchase" button, as shown in below image

- After Clicking on "Cancel Purchase" of Particular Bill, a Message will be Displayed on Screen "Successfully Purchase Cancelled" , as shown in below image

For More Query/Support, Feel free to Generate Ticket or Call us on +91 8447740155
Thank You !


Comments
Post a Comment