Item Master Help Guide
How to Create/Modify/Delete Item in Chanakya ERP
Create Item Master
- Click on Item Master in Master Menu to open item master option as shown in below image.

- Enter/select appropriate value in field shown in above image.
- Description of each field is given below. (fields name marked with * are mandatory field.)
- Category (*): Select category of item from the list (Goods/Services)
- Goods : Stock/Inventory will be kept.
- Services : Stock/Inventory will not be kept.
- Item Code (*): An unique code of Item. It will also be considered as Barcode.
- Description : Description/Details of Item.
- HSN/AC Code: Enter HSN/SAC for the item or services. (Do not enter anything except HSN/SAC )
- Barcode Print : Select "Yes" for print barcode sticker of item during purchase else select "No".
- Batch Required: Select "Yes" for manage Batch Wise Stock of item (like pharma segment) else select "No".
- Unit : Select unit for the item from list like Pcs./Kgs./Mtr./Pair etc.
- Qty/Case : Enter packing of items if you want to manage case/packing/carton during invoicing else continue with default value "1". (Case Billing can be enabled from Misc. Settings)
- Re-Order Level: Enter Re-Order Level for item for generate auto purchase order if stock goes below ROL. Default Value "0".
- Purchase Price : Enter Purchase price of item (exclusive GST)
- MRP : Enter MRP of item (inclusive GST)
- B2C Price : Enter Retail/Counter Sale Price (inclusive GST), if different from MRP.
- B2B Price : Enter WholeSale/B2B Sale Price (inclusive GST), if different from MRP. (Discount will be applied during billing separately through manual entry or automatically through Misc. Settings and Party Wise Discount configuation)
- Location/Bin No.: Enter Location/Rack No/Storage ID etc to find item physically (if applicable.
- Product Group (*): Select Product Group for Item. To Create New Product Group Click on "+" Symbol or Press "F12" Key of Product Group Box. (Select/Create N/A if not applicable)
- Brand Group (*): Select Brand Group for Item. To Create New Brand Group Click on "+" Symbol or Press "F12" Key of Brand Group Box. (Select/Create N/A if not applicable)
- Mfg By: Select Manufacturer (useful for pharma segment) for Item. To Create New Manufacturer Click on "+" Symbol or Press "F12" Key of Mfg By Box.
- GST Group: Select GST Group for Item to apply correct GST on item during transaction. To Create New GST Group Click on "+" Symbol or Press "F12" Key of GST Group Box. (To Apply correct GST Rate on GST Group use Applicable GST Settings)
- Status (*) : Select "Active" as status for create new item.
- Now Click on "Add" Button to create this item.
- When item will successfully created then a message will appear like below image.

- Click on any button.
- Yes : To refresh item list
- No : Continue without refreshing item list.
Modify / Deactivate (Delete) Item.
- Click on Item Master in Master Menu to open item master option shown below.
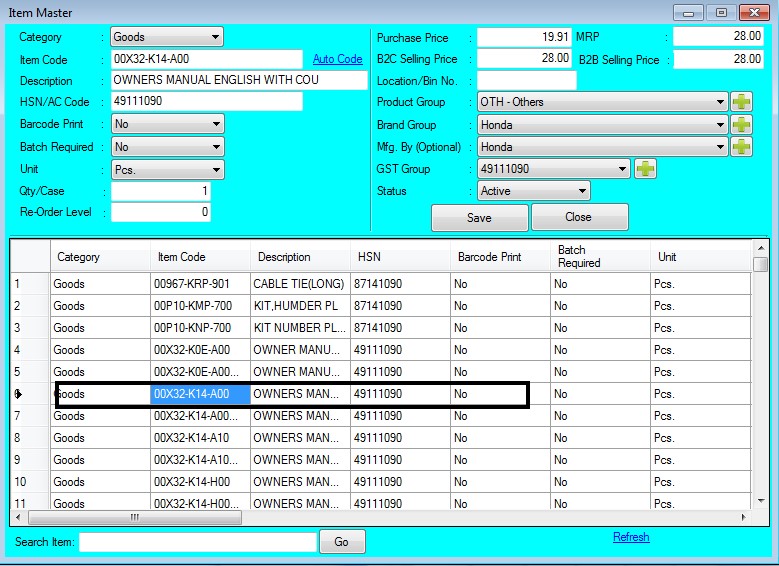
- Double click on item which you want to modify or deactivate from the list as shown in above image. Item can be also searched through search item option.
- Then change the value as per requirement/need.
- To deacticate Item
- Status (*) : Select "Deactive" as status for deactivate item for transaction & reporting.
- Click on Save Button to save the changes.
- When item will successfully created then a message will appear like below image.

- Click on any button.
- Yes : To refresh item list
- No : Continue without refreshing item list.
Author : Mr. Dhiraj Kumar


Comments
Post a Comment