Value Added Service 💥Free💥 ( Whatsapp, SMS & E-mail) Configuration Help Guide
How to Configure Paid SMS,💥Free💥SMS, E-Mail and 💥Free💥Whatsapp in Chanakya ERP
- Go To Tools Menu
- Click on VAS Setup, Following Window will be open as shown below

- There are Three Value Added service for Configuration, SMS, E-Mail & Whatsapp, First we will see the Setting of SMS configuration
- SMS Configuration:- For SMS Configuration you have to first of all follow these steps one by one.
- Register on DLT (Distributed Ledger Technology) Platform, Those who provide SMS Features
- After Successful Registration, Register for Sender ID (Which Should be off 6 Digit, (following Company name in short), through which the Message will be sent to Customer
- After Registration of Sender ID, the Registration of Template is done (Means type of Message Format)
- After Verification of Template from Government side (which might Take 24 to 48 HRS.), That Template is verified and matched on SMS server Company
- After that User ID and Password is generated(Which can also take 24 to 48 Hrs.)
- That User ID and Password is Configured in software
- Click on Validate & Save Button to Validate the User ID and Password
- Check the Status as "Enabled"
- Enter The Sender ID which was created Earlier On DLT Platform and Check "Status"
- Select the Route (Campaign, Informative & Trans.)
- Set the SMS Sending Frequency, SMS Delivery Report Frequency (basically Set to 2-3 Min.)
- If you want to send the copy to Admin then Click on the Check Box
- Click on Save Button to save all details
- If you want to Check the balance of your SMS pack then Click on Check Balance Button
- If you want to change the password then Click on Change Password Button
- You can Enable Auto SMS Settings, Module Wise (Invoice B2C, B2B, Money Receipt and Payment Vouchers). Click on Save Button to save the Settings.

- Second Option is for E-Mail Configuration
- E-Mail Configuration:- For E-Mail Configuration follow the Steps Below
- Enter the Email Id in E-mail Address column
- User name will be same as Email Address
- Password (Either you mail Password or Set Single Password from Mail Setting)
- SMTP Server is default set for Gmail Account
- Port and Connection is By default set, no need to change
- Status will be Changed to "Enable"
- Set Email Sending Frequency to 2-3 Min.
- Click on Validate and Save Button to Validate & save the Setting done
- You can Enable Auto Email Settings, Module Wise (Invoice B2C, B2B, Money Receipt and Payment Vouchers). Click on Save Button to save the Settings.

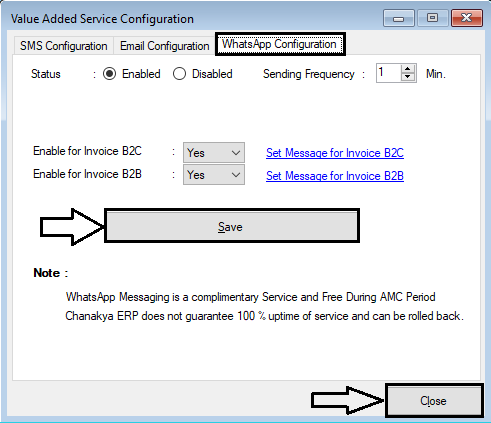
- Third Option is Whatsapp Configuration 💥Free💥
- Whatsapp Configuration:- For Whatsapp Configuration follow the Steps Below
- Select the Status Enabled
- Set the Sending Frequency to 1 Minutes
- Enable for the Invoices According to your Business
- Set the Message for Invoices (By Default Message is Set) but You can Make your Own if needed
- Click on Save Button to Save the Message you have Set and close the Pop up Window
- Finally Click on Save Button and Close the Window
- Logout from Software and Login again to access the Features of Whatsapp during Invoice making, Ledger Sending and All Vouchers Entry Transaction
- One more Option has been Updated Regarding SMS service, Which will be Available for free to User (During AMC Period)💥Free💥
- It has been Named as SMS Configuration(Free)
- Enable this Feature in Invoice B2C and B2B and Set the Sender Name & Sender Contact Number
- Click on Save Button and Logout and Login Again to Enable Settings

For More Query/Support, Feel free to Generate Ticket or Call us on +91 8447740155
Thank You !


Comments
Post a Comment